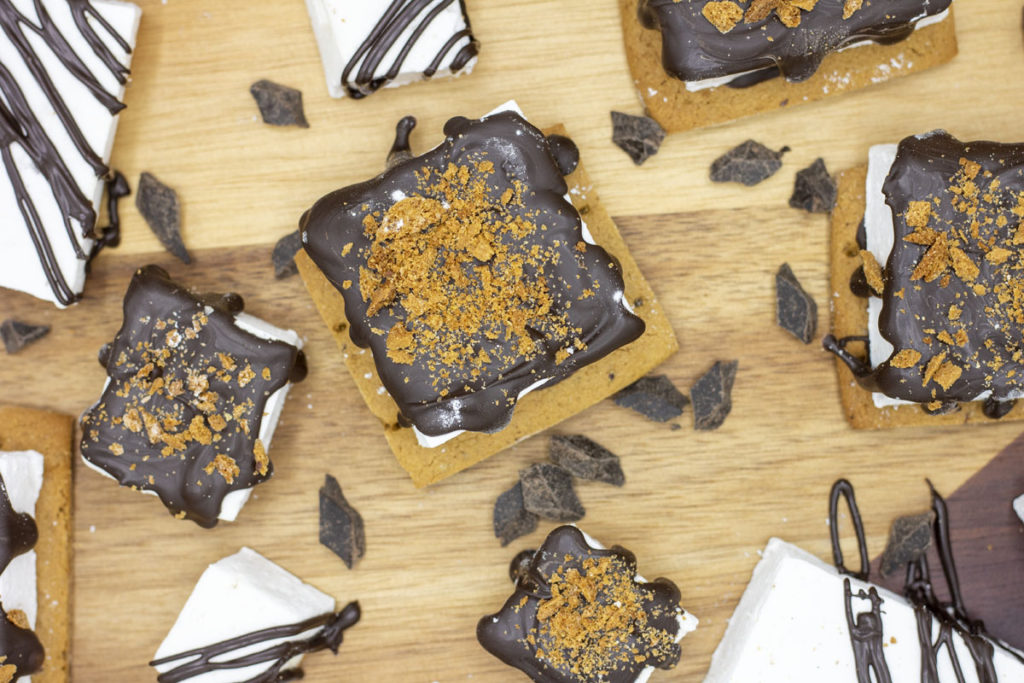
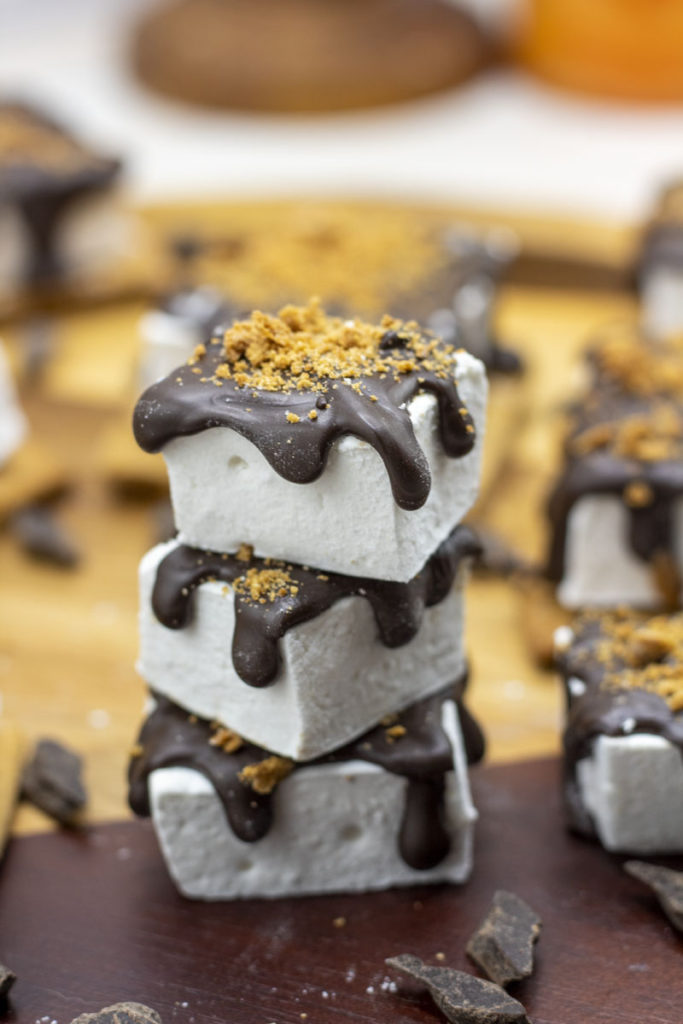
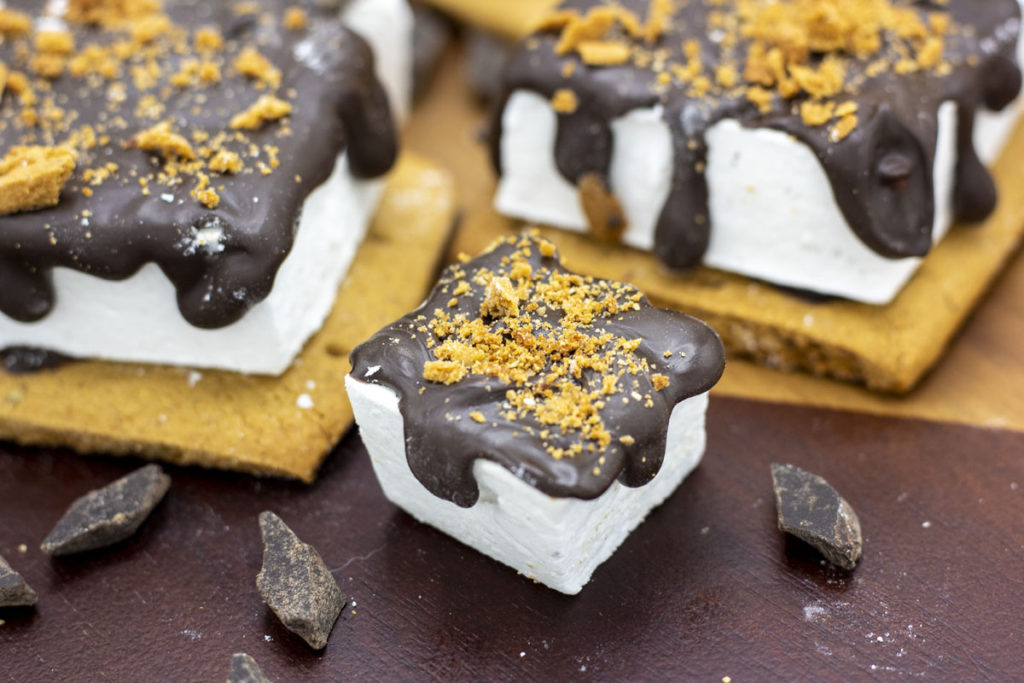
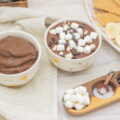
homemade marshmallow s’mores;
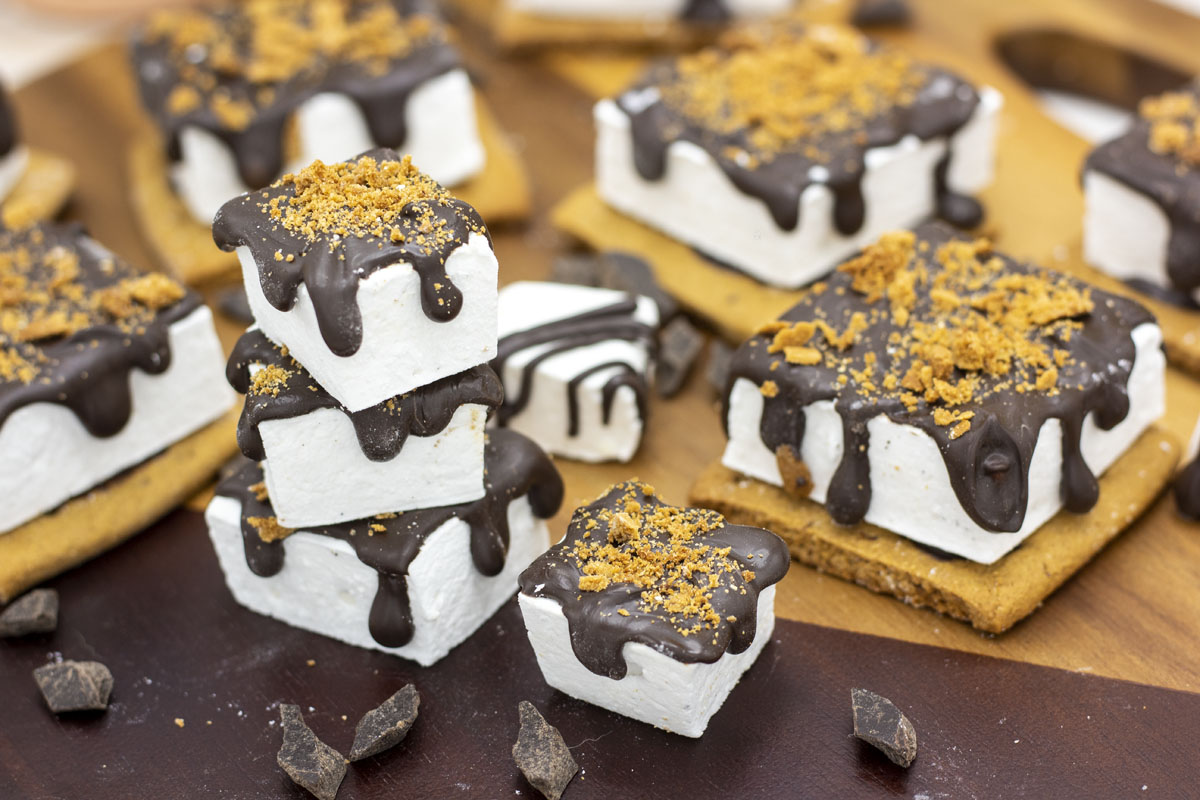
These homemade marshmallow s’mores are made from scratch and the perfect delicious summer treat. Homemade vanilla bean marshmallows are soft, squishy, and just melt in your mouth! Stack those fresh marshmallows on graham crackers–or make your own homemade gluten-free graham crackers. Then, of course, add the chocolate, and top with more crushed graham crackers.
Vanilla bean homemade marshmallows are classic, rich treat that’s the perfect marshmallow canvas for s’mores. I promise you, once you’ve tasted these, you won’t go back to storebought! The key to fluffy tall marshmallows is the whipping. You really need an electric mixer to make marshmallows. Hand or stand mixer will work, but you definitely don’t want to do it by hand. It takes a lot of whipping to make marshmallows light and airy.
Start with blooming your gelatin in cold water. I’ve found that if I add the gelatin first and then pour water over it, it’s much more likely to clump. So I add the water and flavoring–in this case vanilla–first. I like to use vanilla bean paste, but vanilla extract is perfectly fine as well. Measure out your gelatin in a small cup or bowl, and then while your mixer is on, slowly pour it in. Since you’re already whipping it’ll help to even it out and prevent clumping.
Once you’ve got your gelatin sitting to bloom, it’s time to cook the sugar. For this part you’ll want a candy thermometer. You’re going to cook the sugar, water, and corn syrup to 240° F, the soft ball stage. You can always use a traditional candy thermometer, but you’ll want to act fast so when the mixture reaches 240° F exactly, you move to the next step. I like to use a thermometer with an alarm like the ThermoDot so I don’t miss the temperature. It does take several minutes and once or twice I’ve gotten distracted and missed the temperature which can ruin the batch.
As soon as you hit the right temperature, start up the electric mixer and stream in the sugar syrup. Then you’ll want to whisk whisk whisk. Whisk 6-8 minutes. You’re looking for the homemade marshmallow mixture to about triple in size. Some also say to look for strings to pull away from the side. If using a stand mixer, you can see this when there are little triangular peaks that pull away from the sides while whipping on hide speed.
Whipping on the 6 minutes side means your marshmallows might not be quite as thick, but will make them a little glossier and smoother. Whipping closer to the 8 minutes side means they’ll set even faster, be fluffier, but may not be quite as smooth on top.
Of course, this is a recommendation that works in my kitchen, but humidity and altitude can make a difference. I find the easiest way to check the consistency is to pull the whisk of your electric mixer out of the mixture and watch how the marshmallow folds back in. I tend to like slightly thinner, smoother homemade marshmallows. So I look for the marshmallow to fall slowly back into the mixture but then settle back into the mixture (as opposed to sit on top).
Work quickly and pour your freshly made homemade marshmallows into your greased pan. Make sure you grease your pan ahead of time. Marshmallows are veeeeery sticky if you don’t prepare yourself. You can use any oil–a neutral oil is good, something like canola, vegetable, or sunflower oil, or generic cooking spray. Really any sort of neutral greasy fat will do, so I’ve heard of people using lard, shortening, butter, or ghee. I’ve used light olive oil or avocado sprays, but be careful as these can have more flavor that may or may not remain on your homemade marshmallows.
The oil is there to keep the mallows from sticking to the pan, but it makes them greasy to the touch, and no one wants that. So you’ll want to brush or rub a powdered sugar and cornstarch mixture over your marshmallows. Oiling or greasing your pan will also help the dusting mixture stick to your marshmallows and help form that slightly dehydrated skin on the outside that keeps the inside moist. You can do powdered sugar by itself, but I prefer adding cornstarch to the mixture as it’s very absorbant and cuts a bit of the sweetness of using pure powdered sugar. You can also use tapioca starch or rice flour–any neutral, fine flour should work.
Once you’ve made your homemade marshmallows, cut them, and dusted them with powdered sugar, I find that it takes a day or two of drying to achieve that perfect texture. But they’re delicious fresh and springy, and they do last for up to two weeks I’ve found! If you make these s’mores treats with homemade marshmallows, the graham crackers will absorb a little bit of moisture. Even after two weeks the graham crackers were a little soft, but still delicious. Just not quite as “snappy” as freshly baked.
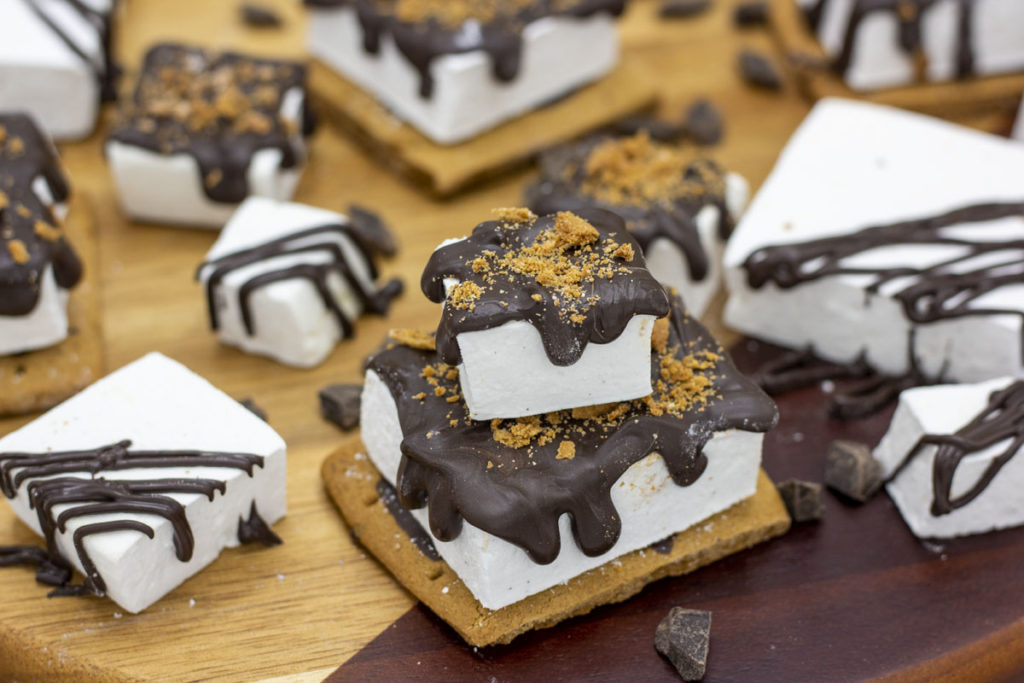
When it comes to chocolate, for this recipe I like candy coating. I specifically used dark chocolate Guittard A’peels here because I didn’t want to temper chocolate on top of homemade marshmallows and homemade graham crackers. They did get a little bit streaky because of the rogue powdered sugar on my hands, but they still look delish! And the dark chocolate paired so well. If you like the drip drop style you see here, it does take a bit of extra work. I used a squeeze bottle for better control around the edges. Of course you can always temper chocolate if you like the extra challenge. Coverture chocolate would elevate these delicious treats even more!
secrets to success;
- Use a candy thermometer. You’re looking for 240° F exactly, the soft ball stage. As soon as the sugar syrup mixture reaches that temperature, remove it from the heat and whisk into your bloomed gelatin. You can use a manual thermometer no problem, just make sure it’s calibrated. For those that want to invest, I like using the ThermoDot, which has a temperature alarm to remind you when you’re close to that exact temp.
- Whip whip whip! Use an electric mixer. You won’t want to whip these by hand. You can use a hand mixer or a stand mixer, though I will say it is pretty nice to pop on the stand mixer and watch it as opposed to actively move the hand mixer around.
- You may have to play with your homemade marshmallow recipe to find your preferred whipping time. Things like altitude and humidity can affect your mallow-making. But don’t be intimidated. I perfer the 6 minute mark myself. They may not have all the height they possibly could have, but it makes them smooth and creamy. Overwhipping can make them tough. I look for a very stiff peak that slowly falls off the whisk of your mixer, and slowly melts back into the mixture. Emphasis on the slow though. When I’ve tried closer to 8 minutes I found they were a little stiffer and harder to spread in the pan and make them flat. Still delicious, and definitely had more height, but I liked my 6 minute whipping for these homemade marshmallow s’mores.
Looking for other summer treats? Check out these delicious homemade recipes:
- Two-ingredient lemon cake bars are the easiest, airiest treat, perfect for hot summer days when you want a little refreshing treat.
- For a literal popping party in your mouth, make these firecracker cookie bars. A sugar cookie bar topped with M&Ms and popping rock candy make a festive firework treat for the fourth of July!
- Go for a cooling drink like this strawberry shortcake vodka slush to cool you down and chill you out this summer.
homemade marshmallow s’mores;
Equipment
- stand mixer OR hand mixer
- digital thermometer strongly recommended
Ingredients
vanilla bean marshmallows;
- 2 Tbsp unflavored gelatin (3 envelopes, 21g)
- ½ Tbsp vanilla extract (alt, sub an additional ½ Tbsp vanilla extract in lieu of the vanilla bean paste if unavailable)
- ½ Tbsp vanilla bean paste (or scrape the seeds of a vanilla bean)
- 1 cup cold water (divided)
- 2 cups sugar
- ½ cup light corn syrup
- ¼ tsp salt
- unflavored cooking spray (to grease the pan; can also use lard, butter, or mild flavored oils like canola oil)
- ⅛ cup cornstarch for dusting
- ⅛ cup powdered sugar for dusting
s'mores;
- 32 squares graham crackers (16 full sheets divided in half. Or make your own gluten free graham crackers–they're even better than storebought)
- 3 cups chocolate candy melts
Instructions
vanilla bean marshmallows;
- Spray a 9"x13" pan lightly with unflavored oil to prevent sticking.
- Add ½ cup cold water and add vanilla extract and vanilla bean paste to a stand mixer or large bowl. (I like to do ½ Tbsp vanilla extract, and ½ Tbsp vanilla bean paste, but you can use 1 Tbsp vanilla extract for a classic light vanilla flavor. Or scrape the seeds of a vanilla bean into the mixture instead of using the vanilla bean paste.)
- Add 2 Tbsp (3 envelopes, approx 21g) gelatin into the bowl as you whisk lightly to incoporate it so it doesn't clump.
- In a heavy saucepan, add remaining ½ cup cold water, 2 cups granulated sugar, ½ cup corn syrup, ¼ tsp salt. Cook over low heat, stirring gently until sugar dissolved.
- Increase heat to medium and boil without stirring until mixture reaches 240°F, about 12 minutes. As soon as it reaches the right temperature remove from the heat.
- Begin whisking the bloomed gelatin on slow speed. Pour the sugar mixture over the gelatin bloom stirring until dissolved evenly. Then add the remaining sugar mixture.
- Beat mixture on high speed until white, thick, and nearly tripled in volume. This should take approximately 6-8 minutes in a stand mixer, and roughly 10 minutes with a hand mixer.
- Working quickly, spread mixture into the prepared baking pan and smooth with an oiled spatula.
- Allow to stand, uncovered for at least 4 hours up to one day.
- Mix together a 50-50 mixture of cornstarch and powdered sugar. Turn out the marshmallows and using a pastry brush, coat with the sugar mixture. Cut into desired sizes, I like to trim the edges, and then cut into 5 columns, Cut each column into squares, makes roughly 25. Brush each individual marshmallow with the sugar mixture on all sides to prevent sticking.
s'mores;
- Roughy crush one graham cracker and set aside. Break the graham cracker sheets in half as needed, to make "squares" (they're rectangles really, but semantics. Half a sheet).
- Melt chocolate candy coating according to instructions or temper chocolate.
- Assemble the s'mores. Add a squeeze of chocolate to the top of the graham cracker and press the marshmallow on top. Top with more chocolate and sprinkle with graham cracker crumbs. For stylized chocolate drips use a squeeze bottle for extra control.
- Allow chocolate to set. Store in an airtight container for up to two weeks. Note, the graham crackers may become softer over time, for that snappy texture, serve immediately.

6 Comments
s'mores truffles; | Best With Chocolate
November 30, 2023 at 6:41 pm
[…] Interested in learning how to make your own marshmallows? I’ll teach you how to make fluffy, chewy, homemade marshmallows in my homemade marshmallow s’mores recipe. […]
raspberry marshmallows; | Best With Chocolate
February 2, 2024 at 7:33 pm
[…] batter marshmallows, it can take away from the sheer height of your marshmallow as compared to the original vanilla recipe. I actually think this 1/2-3/4” height makes for the perfect s’mores size, especially when you […]
sour fruit juice gummies; | Best With Chocolate
April 22, 2024 at 8:38 pm
[…] Make your own vanilla bean marshmallows and use them in these homemade marshmallow s’mores! […]
10 favorite summer recipes; | Best With Chocolate
May 10, 2024 at 8:00 am
[…] make a summer recipes list of just the s’mores-inspired recipes I’ve shared, including s’mores marshmallows and s’mores kiss […]
brownie batter marshmallows; | Best With Chocolate
December 8, 2024 at 10:56 pm
[…] out these homemade marshmallow s’mores. Swap these brownie batter marshmallows for the vanilla bean ones and make your own graham crackers […]
5-ingredient homemade cheez-it crackers; | Best With Chocolate
April 13, 2025 at 8:48 am
[…] For a slightly sweet treat, try homemade gluten-free oat flour graham crackers. They’re so so so much better than storebought, plus they’re simply divine when you make homemade marshmallow s’mores. […]