hot chocolate bombs;


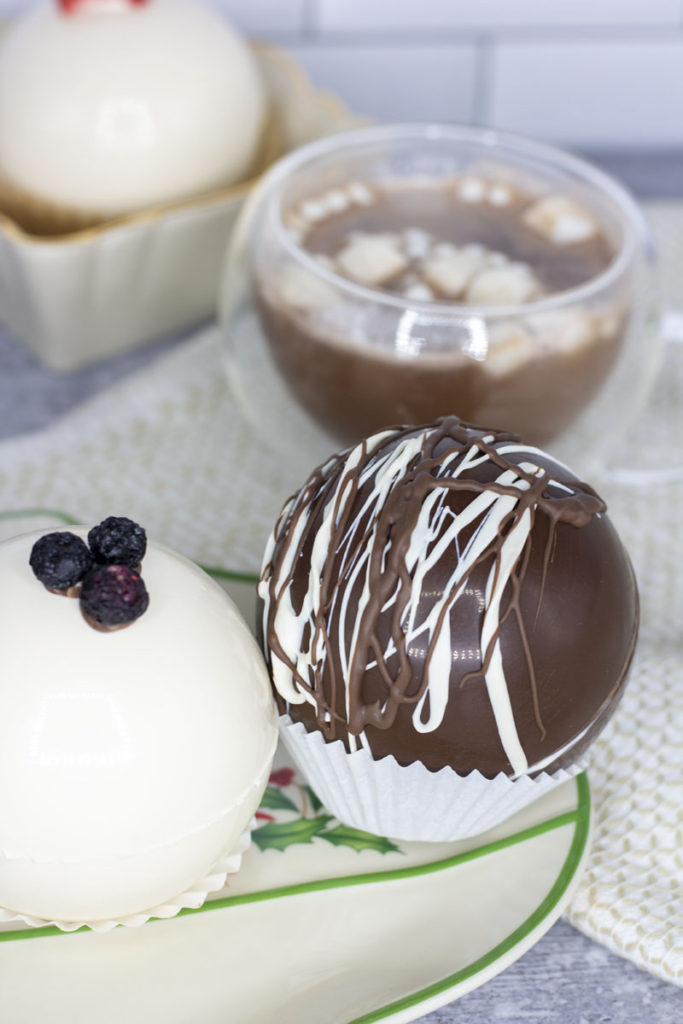
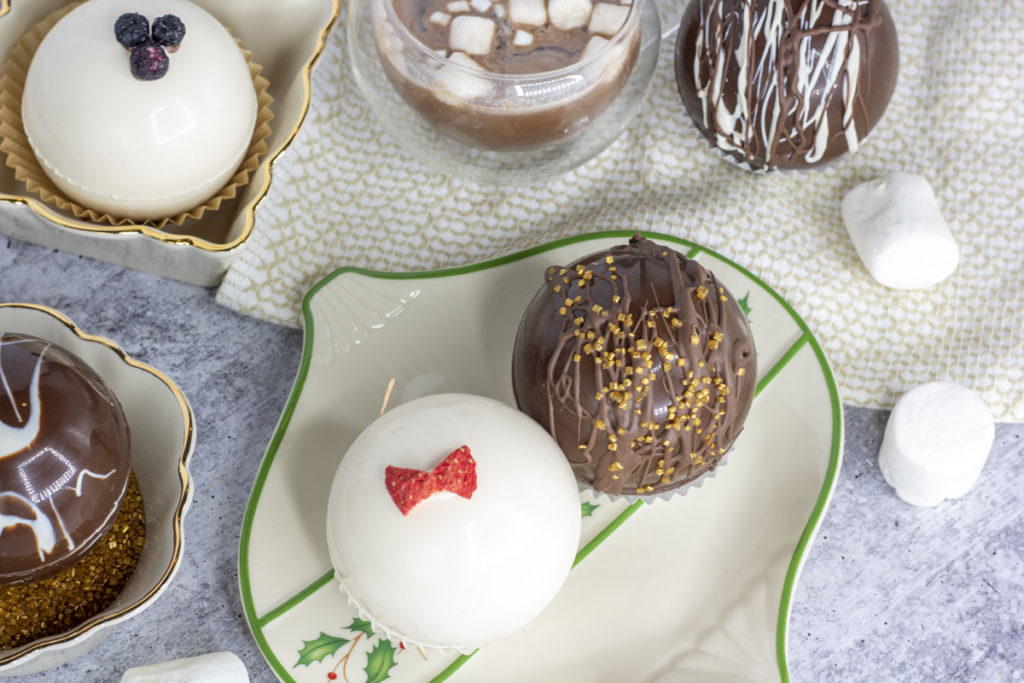
The hot chocolate bomb fad has been taking over and these chocolate confections are flying off the shelves! Take a giant chocolate sphere and stuff it full of chocolate, cocoa, marshmallows, and more. Pour warm milk over the the hot chocolate bomb and watch as it melts to reveal an explosion of marshmallow hot chocolate goodness!
In theory the concept to making a hot chocolate bomb is pretty simple. Make two halves of a sphere, stuff it full of goodies and seal the two halves together. In practice…well, easier said than done. I’ve tried a traditional half sphere polycarbonate mold and full out tempering chocolate. And while it works…it definitely has a high fail rate for me.
I’m sure with practice I could make the traditional tempering in a polycarbonate mold to work. When you make molded chocolates in what I’ll call the “traditional chocolatier” way, you’re usually looking for thin shells. It works great for something small like a bonbon. But when you’re making a sphere as large as your fist for a hot chocolate bomb, it needs to be a little sturdier. So I’m here to tell you there’s an easier way!
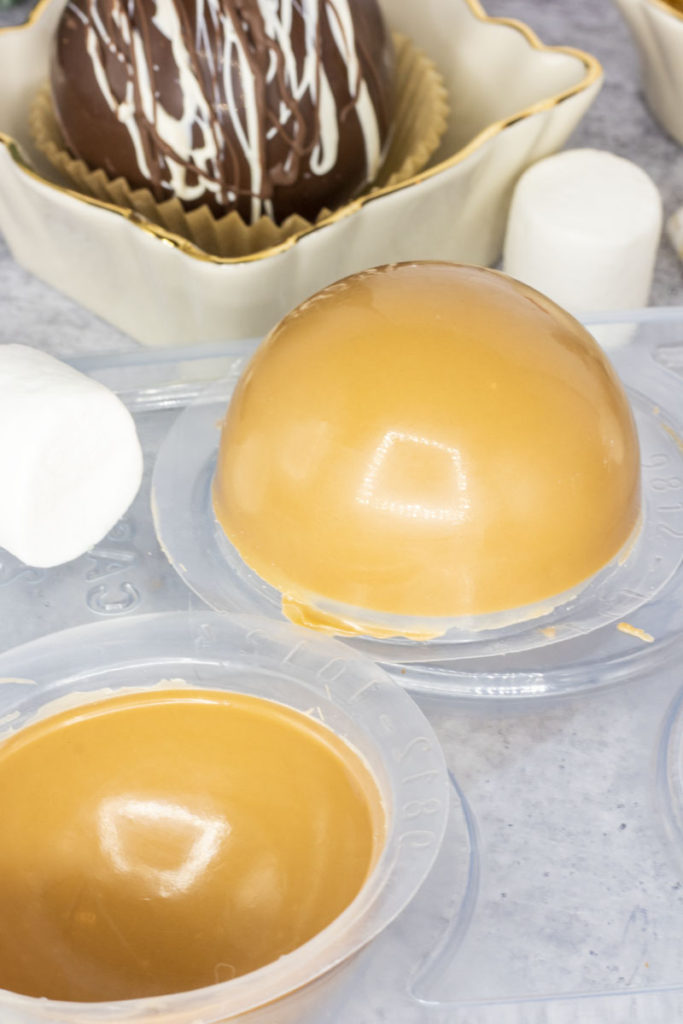
Three piece molds. So let’s talk about how a three piece chocolate mold works. The first piece is the base with a cavity, in this case a half sphere. The second piece is a domed flexible insert that is slightly smaller than the base cavity. You can see this piece still still in the domes in the photo above. You insert it, domed part down into a cavity on the first piece. The fact it’s slightly smaller leaves a thin window for the chocolate to make your shell and set. The third piece looks like the first, but the domes are the smallest of the three. You insert this one dome side down, and press it lightly to help the chocolate evenly distribute.
I use these plastic molds. The upside is that compared to polycarbonate molds, these three piece molds are cheaper. The downside is that plastic molds can be a little flimsy and I find them harder to store (read: more likely to get scratched or damaged). The ones I linked have a fill line. This theoretically helps to know how how much chocolate to put in each mold. I found for this set that I liked to overfill them a little bit, otherwise the edges were sometimes fragile and would break easily. But once I got a good system going, I didn’t have too many rejects.
secrets to success;
The hot chocolate bomb three piece molds itself should be pretty simple to use once you’ve had a couple practice goes. And now to share some tips from my own failed experiences!
- Use all three pieces of the mold. The three pieces are there for a reason. I spent a lot of time my first few uses trying to manually use my fingers to spread the chocolate under the second piece. Not worth it, and the results weren’t even good. I had a lot of chipped or unfilled edges that resulted in unusable half spheres.
- Look for the lip built into the second piece of the mold. Even if my first attempts didn’t result in usable bombs, at least I learned something! You want to check that little lip is full and has no air bubbles. You can save yourself some time by checking these before you pop your molds in the fridge. Because the inserts are flexible, you can even squeeze out air bubbles with a light touch. But if you’re using the mold correctly, you shouldn’t have too many!
- Muffin tins and muffin cups are your friends! When you turn out your chocolate spheres, set them in a muffin tin with muffin liners to help keep their shine. Handle them as little as possible to keep that sparkling shine.
- Use a heat proof flat surface to fuse your two halves together. I have a ceramic plate that I popped in my toaster oven. I actually used the bottom of it to have a flat surface instead of the slightly curved top of the plate. Another option is to heat a frying pan on the stove, and then use the bottom (or top, if it has enough flat surface area). Take it OFF/OUT of the heat before you start. Depending on how hot your surface is, you may need to move fast. When you rub each half sphere on the surface, it melts just enough to fuse with the other half when pressed together.
The chocolate you use is important. The most important factor is chocolate you like, want to drink, and find easy to use. In a perfect world, I’d love to use a hand-tempered chocolate. In reality, especially when you’re practicing, I recommend a compound chocolate. This is chocolate that usually does not require tempering and has some additives that help it set up better. I like guittard a’peels, but candy melts are another accessible option.
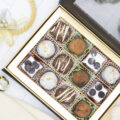
They’re not “real” chocolate, I fully admit and agree, but they don’t require as much precision in timing. And they successfully made nice polished hot chocolate bombs as you can see for my photo here. If you want to use tempered chocolate—I salute you! But for those who find tempering chocolate intimidating or don’t want the stress of timing everything perfectly, go for compound chocolate. I also personally find compound chocolate makes more sense to melt the small quantities I need for my two hot chocolate bomb molds.
hot chocolate bomb flavors;
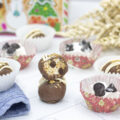
Then let’s get down to fillings! Marshmallows are a must. I like using mini marshmallows, but also dehydrated marshmallow bits. Depending on the flavor and chocolate I’m using for the bomb, other fillings can vary. Here’s some suggestions on flavors:
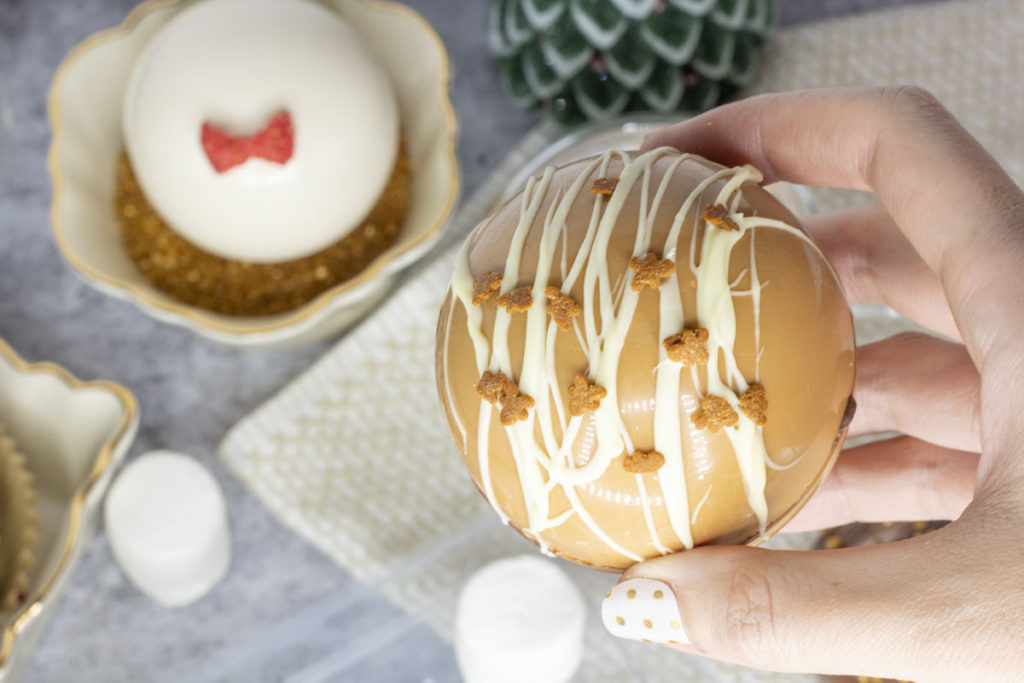
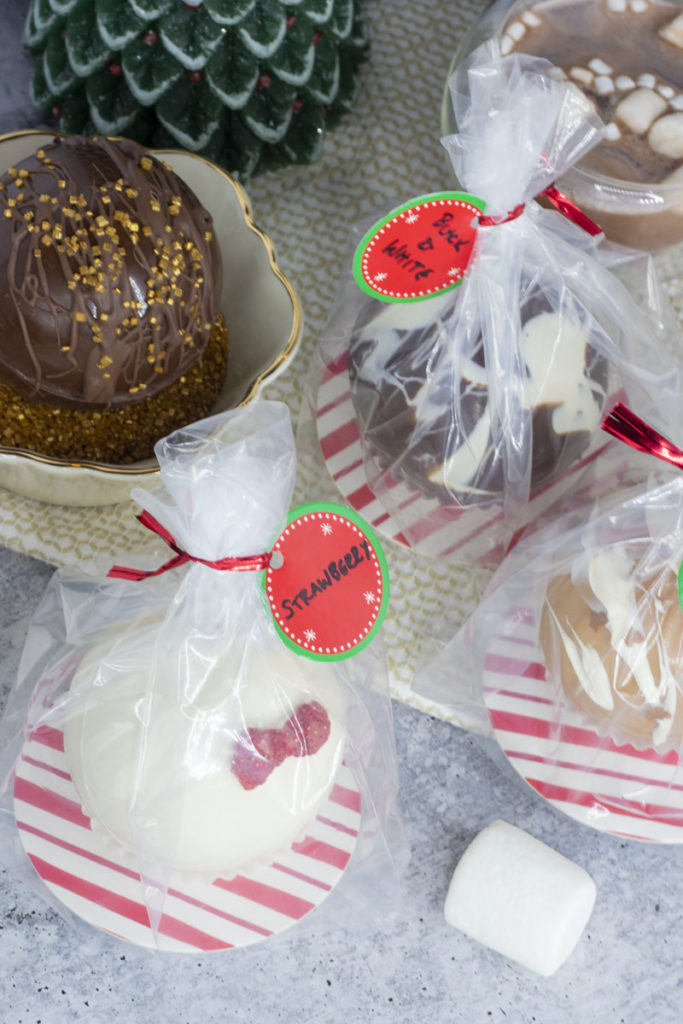
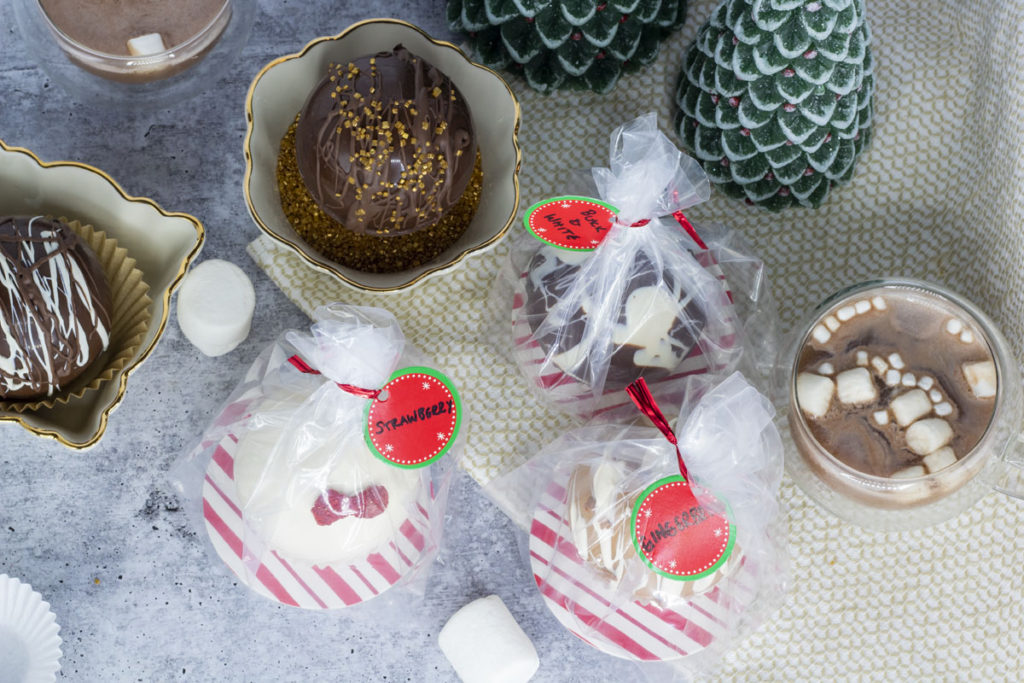
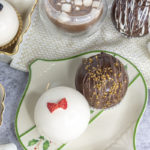
- Strawberries and cream (white chocolate shell with dehydrated strawberries and marshmallows. Top with a dehydrated strawberry bow.)
- Caramel (milk chocolate shell with caramel sauce and marshmallows. Top with gold sprinkles.)
- Blueberries and cream (white chocolate shell with dehydrated blueberries and marshmallows. Top with dehydrated blueberries.)
- Apple cinnamon (white chocolate with dehydrated apple slices and cinnamon. Top with crushed dehydrated apple slices.)
- Black and white (marbled white and dark chocolate shell with chocolate shavings and marshmallows. No topping necessary.)
- Gingerbread (seasonal gingerbread candy melt shell filled with marshmallows and gingerbread sprinkles. Top with a white chocolate drizzle and gingerbread sprinkles.)
- Peppermint bark (mint chocolate shell filled with crushed candy canes and marshmallows. Top with a drizzle and sprinkled candy canes)
Looking for other treats perfect for gifting at the holidays?
- The ultimate holiday truffle guide is your one stop shop for truffle ideas and chocolate deliciousness!
- Check out these butter sprinkle cookies that are cute, and festive, and I even share how I package them to make them look extra adorable.
- For something unique, try these slow cooker candied cinnamon nuts. It makes a large batch, makes your house smell heavenly, and makes for the sweetest (literally) gift! Plus they’ll keep for a while, and you can throw them on this raspberry california salad.
hot chocolate bombs;
Equipment
- (2) three-piece chocolate sphere molds
Ingredients
- 1 cup chocolate compound (like candy melts, or guittard a'peels. Can substitute melted tempered chocolate as well)
- 8-10 mini marshmallows
- 1 Tbsp dehydrated marshmallows
- additional toppings (see notes for suggestions)
Instructions
- Assemble your three-piece molds first. Remove the top piece, and the inserts and set them nearby. Have the bottom piece ready to receive the chocolate. Set up a muffin tin with 6 liners. We'll use this later to hold the chocolate shells.
- Melt your candy coating according to package instructions. Melt in the microwave in bursts of 20-30 seconds, stirring between each blast. Stop when the majority of chocolate is melted and there are only a few lumps left. Stir until remaining chocolate lumps have melted completely.
- Add chocolate to the fill line of your mold. Repeat for each cavity, 6 in total across the two molds.
- Place the flexible insert, second piece of the mold into each cavity, pressing down slightly so the chocolate starts to spread (does not need to come all the way up the sides at this point.)
- Once a set of three has the flexible insert, use the top third piece of the mold to press into the cavities so the chocolate climbs fully up the sides and stops at the lip of the flexible insert. Repeat for the second mold.
- Check the cavities lips for air bubbles or thin chocolate and use your fingers to press out the air pockets or redistribute chocolate as needed.
- Refrigerate the molds for approximately 10 minutes. (This length of time worked well for guittard a'peels, your chocolate may vary. It can be left for longer as needed.)
- Carefully demold the chocolates, placing them in the muffin tin. If the right consistency, they should come out of the molds with minimal coaxing. If stuck a little, gently squeeze the mold cavities near the edges to loosen it. You can also look for air bubbles–you want to see the chocolate retracting from the plastic. Leave the flexible insert in for now (though it's no problem if it slips free).
- Carefully peel away the flexible insert. I find it helps to use a chopstick to minimize fingers touching or melting the spheres. I pull away using one hand and use the tip of the chocolate to hold the inside of the sphere for more leverage to separate the plastic.
- Prepare fillings. Add marshmallows, cocoa powder, sprinkles, chocolate, or fruit. Add filling for an individual bomb to a small cup or bowl.
- Heat a small frying pan on the stovetop, or heat a flat ceramic plate in a toaster oven. Remove from the heat.
- Working quickly, grab one half of the bomb, and press the lip to the plate for a second or two until the edge just melts. Pour in the fillings. Repeat the melting process with the second half and press the two halves together. Set back into the muffin tin. Allow to cool for 15-20 seconds or until set.
- Melt any additional chocolate and drizzle over the top. Sprinkle on any toppings like sprinkles or fruit.
Notes
- Strawberries and cream (white chocolate shell with dehydrated strawberries and marshmallows. Top with a dehydrated strawberry bow.)
- Caramel (milk chocolate shell with caramel sauce and marshmallows. Top with gold sprinkles.)
- Blueberries and cream (white chocolate shell with dehydrated blueberries and marshmallows. Top with dehydrated blueberries.)
- Apple cinnamon (white chocolate with dehydrated apple slices and cinnamon. Top with crushed dehydrated apple slices.)
- Black and white (marbled white and dark chocolate shell with chocolate shavings and marshmallows. No topping necessary.)
- Gingerbread (seasonal gingerbread candy melt shell filled with marshmallows and gingerbread sprinkles. Top with a white chocolate drizzle and gingerbread sprinkles.)
- Peppermint bark (mint chocolate shell filled with crushed candy canes and marshmallows. Top with a drizzle and sprinkled candy canes)


4 Comments
buckeye pretzel bites; | Best With Chocolate
December 10, 2021 at 12:53 pm
[…] hot chocolate bombs are great gifts for winter. I give you lots of options for different fun flavors too. […]
raspberry marshmallows; | Best With Chocolate
February 23, 2024 at 7:18 pm
[…] course, marshmallows are a perfect pie with hot chocolate—so make your own hot chocolate bombs and use your homemade raspberry marshmallows for a made-from scratch […]
brownie batter marshmallows; | Best With Chocolate
July 8, 2024 at 12:18 pm
[…] these homemade brownie batter marshmallows into your hot chocolate bombs to elevate them even […]
peanut butter and jelly truffles; | Best With Chocolate
July 19, 2024 at 9:49 am
[…] Hot chocolate bombs are a wonderful treat for the colder weather. Chocolate shells stuffed full of cocoa mix, marshmallows and more! […]