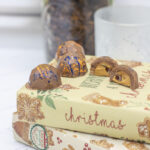
pb&j truffles;
Thin milk chocolate shells surrounding a creamy peanut butter center studded with chewy gems of cherry jelly bits.
Oven Temp: -
Servings: 40
Print Recipe
Pin Recipe
Equipment
- chocolate molds (if making molded chocolates. Polycarbonate is best for tempering chocolate, silicone molds can be used but may cause bloom.)
- candy thermometer (if making molded chocolates. See notes for replacements and how to adapt the recipe to skip tempering chocolate.)
- piping bag + large round tip (if making molded chocolates. Tip needs to be big enough to allow jammy bits through. I will actually skip the tip if the bag hole is sufficient.)
Ingredients
for molded truffles;
- 8 oz milk chocolate (plus more for seeding)
- ⅔ cup peanut butter (I prefer Skippy)
- 3 Tbsp jammy bits (alternatively you can layer in your favorite jam)
- colored cocoa butter (optional)
Instructions
- Prepare your chocolate molds. Polish the molds using cotton balls and/or isopropyl alcohol and make sure there is no residue. This helps ensure smooth shells and helps temper the chocolate. I recommend lining your work surface with parchment paper or a large silicone mat to help with mess.
- (Optional) Decorate your chocolate molds. Heat the colored cocoa butter according to instructions and paint, flick, draw on any patterns or colors you want to use. For these I used a (clean) paintbrush to flick different colors onto the molds for the splatter effect. For best results allow to set overnight.
- Temper your milk chocolate. Temper the milk chocolate. Add 8oz of milk chocolate to a microwave safe bowl (plastic is best, so as not to retain residual heat). Microwave 30-second increments, stirring the chocolate as it melts. Bring to 45°C. This ensures all the crystals are melted and you have a clean state for tempering.
- Once the chocolate has reached 45°C, continuously stir the chocolate. Add in your seeding chocolate in small amounts, stirring vigorously to melt the new chocolate into the liquid chocolate. The temperature will slowly reduce to 27°C. This will take several minutes.
- Create the molded chocolate shells. Once the chocolate has reached 27°C, quickly pour over the molds and fill all cavities. Shake vigorously to remove any air bubbles from the molds. Quickly overturn the molds and allow the chocolate to pour out. I pour directly onto a silicone mat because I find it easiest to recycle the leftover chocolate later, but you can also pour it back into the original bowl. (Note: pouring chocolate back into the original bowl may be more likely to cause bloom if you use the same chocolate to fill another mold.) Repeat steps for all molds.
- Allow shells to set. Make sure to place the chocolate molds in a cool, dry place to set. Ideally you want to circulate air as much as possible around the molds. I usually store them upside down as well, as it helps the rims have a little extra thickness for capping. Allow to set overnight so the chocolate crystallizes without impediment.
- Fill the shells. Melt your peanut butter in the microwave. You want it runny enough to pipe or spoon into the shells, but not too hot that it will cause the chocolate shells to come out of temper. I usually microwave for 20-40 seconds before stirring, but time may depend on the strength of your microwave.
- Once peanut butter is melted, fold in the jammy bits. Fill the piping bag with filling and pipe into each mold, leaving about an ⅛" at the top (or preferred thickness for the base). Add additional jammy bits as needed.
- Cap the chocolate. Repeat the process for tempering milk chocolate. Add to a bowl, heat to 45°C and then seed and stir until 27°C. Fill the remaining cavities with chocolate and scrape off the extra. Allow to set overnight.
- Turn out the truffles. If the chocolate is tempered correctly, it should retract from the molds and turn out easily or with some light tapping of the molds. If some are being particularly stubborn, you can pop the mold into the freezer for 2-5 minutes and then try turning them out. It's helpful but it can diminish the shine on your truffles.
Notes
To make these truffles without molds or tempering chocolate:
- Mix confectioner's sugar into the peanut butter to help make solid balls. Add 1½-2cups confectioners sugar to your peanut butter and blend together. You can optionally add ½ tsp vanilla extract. Start with 1½ cups of confectioner's sugar and taste test. You want the mixture to form a ball and not stick to your hands. Add additional confectioner's sugar as needed. Fold in the jammy bits, then roll roughly 1 Tbsp balls and set on a baking sheet.
- (Optional) Refrigerate or freeze the peanut butter balls. This can help them keep their shape and firm the filling for coating.
- Replace the 8oz chocolate with chocolate coating. (I recommend Guittard a'peels, or Ghiradelli Coating Wafers.) Skip the tempering steps and melt according to package instructions. Dip each truffle in coating and set on parchment paper or a baking sheet as needed to firm.
- Decorate as desired. Sprinkle with chopped peanuts and crushed dehydrated strawberries, or fun sprinkles. You'll want to add embellishments directly after dipping while the chocolate is still melted to help them stick!
Did you make this recipe?Mention @bestwithchocolate or tag #bestwithchocolate!